A Product Breakdown for a Natural Makeup Application.

What can you expect in a session when you request natural makeup?
We still need the full hour together and you would be surprised that I use a good bit of product. I even built up multiple layers of each product on top of each other.
Below you can shop all of the products that I used to create a natural makeup look. These are some of my favorite products in my kit and the ones I reorder the most. If you’re looking for makeup that looks natural in person, photographs beautiful and lasts throughout the day- you are in the right place!!
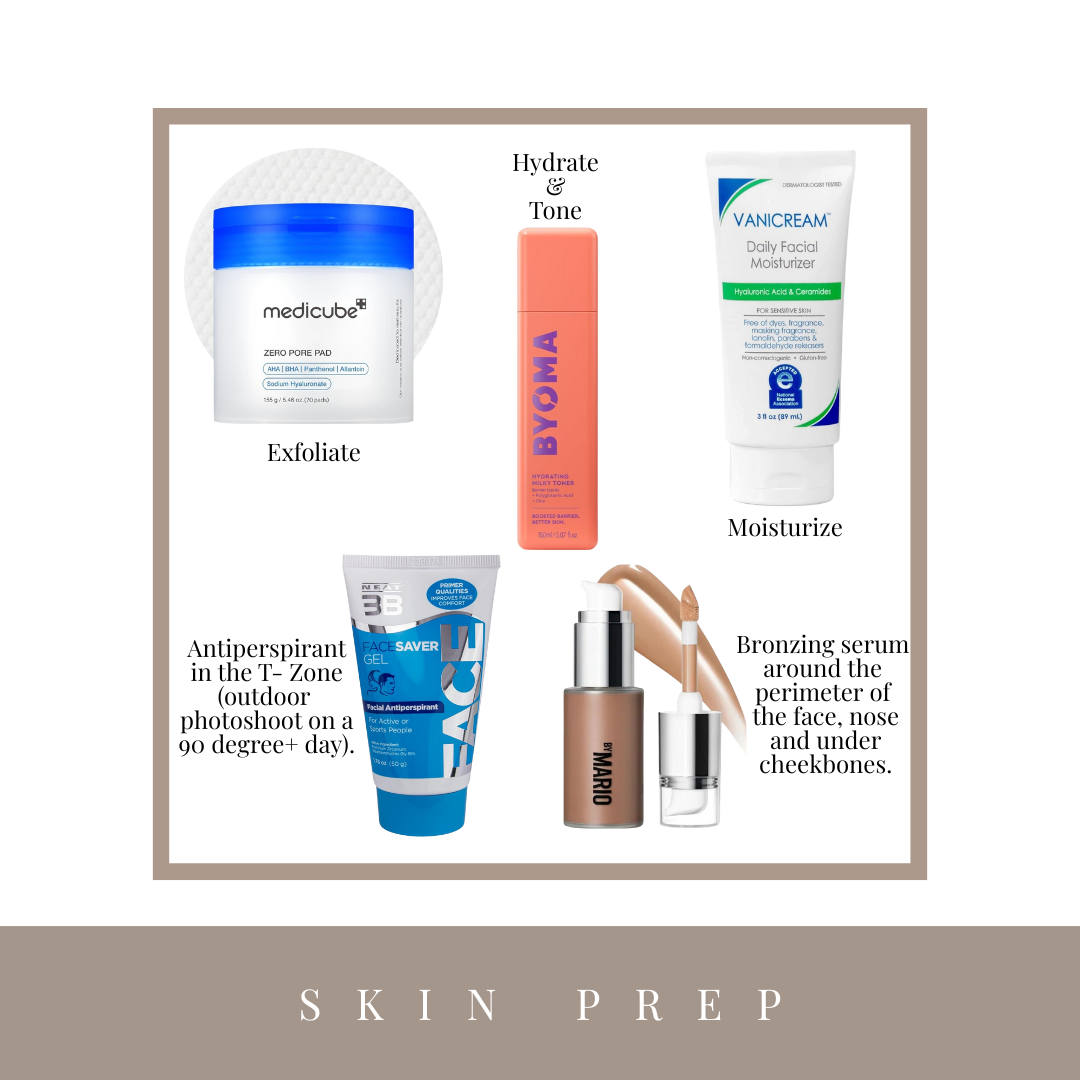
I love to start off every application with a light exfoliation, a toner that calms and hydrates and then finish with a moisturizer. Then I will add in a few customized skin care measures depending on the skin type, the environment and the longevity expected for the makeup.
This appointment was scheduled on a 90 degree evening. Erin Rose Photography is taking photos of her client outside walking around the French Quarters of Downtown Charleston. This was my first time putting the Face Antiperspirant to the test and I have to say I was impressed!
My current favorite exfoliation method is the Medicube Zero Pore Pads. They are convenient for travel, gentle on the skin and helps remove the lightest layer of dirt from the day so that I can add in a nice hydrating toner.
Toners are one of my favorite products and I do frequently swap new ones in and out of my kit. Last year I was obsessed with Snail Mucin and this year I’m all about a milky toner. This one by Byoma has squalane in it so it gets the skin plump, juicy and hydrated,
Vanicream has been my personal favorite moisturizer for over a year now. I’m never loyal to any specific moisturizer but this one is a constant repurchase for me. It’s gentle, it’s thick, creamy, soothing and protects the barrier of the skin. It’s the perfect base to lay down before starting with liquids, creams and powders.
Her skin was perfect. Just for fun, I mixed some of the Makeup by Mario Serum with the Vanicream and swiped it around the perimeter of her face to give her a sheer golden glow.

When it comes to brows, I cannot tell you how much I LOVE ELF Products. The ELF Pencil is $2-$7 and the shades are all very realistic to mimic most natural hair colors. I also love the ELF Brow Lift to add shape and grip into the brow hairs. Once I get the brow exactly as I want it, I secure the entire look by spraying got2bglued hairspray on a spoolie and run it through the brows.
For her eyes I wanted to keep them tightly defined with a bit of shimmer for added brightness. I primed the lids with Tarte’s shape tape, used the Hourglass Bronzer to swipe above the crease and combined the pink and white shades from the Dior Highlighter Palette for the lid space. Using Urban Decay Blackout Eyeshadow and a skinny flat brush, I pressed the shadow into her lashline before and after applying false lashes.
I spend a good amount of time on eyelashes but the perfection here matters! First I prime and then follow up with mascara (loreal voluminous). My client was comfortable with lashes so I went ahead and used the Ardell 421 lashes. They’re so fluffy and pretty. When a client is hesitant on lashes, I often use individual lashes to complete the look so that they don’t have the feel of a “band” across their lash line. I’m really not a fan of the end result or stiffness of a waterproof mascara. To waterproof everything, I apply a coat of Danessa Myricks blackout, this also helps to combine your lash with the lash we added.

For subtle dimension, I reversed the usual technique we know as foundation, contour, conceal powder. Using the Fenty Match Stix, I contoured around her face and then set the contour with the Hourglass Bronzer. When it comes to a natural look, the tones you incorporate are what really brings the makeup to life. We agreed that incorporating a light rosy pink would be beautiful and match well with all of her different outfits and it works well with the natural undertones in her skin. I went in heavy with the blush, knowing that I would follow up with my concealer and foundation to make it seamless. Hourglass Luminous Flush Blush and Milani Dolce Pink was the perfect soft pink combo to add in light pigment and lots of luminosity!
This next step brings the entire look together. Using my foundation, I tap on the jawline, down the neck, on the chest, in the center of the face and around the eyes. Then, with a much lighter concealer I added a brightening layer to the sides of the nose and under the eyes.

Finally, we are almost finished! Spritzing the face with the Rosewater & Glycerin Hydrating Facial Mist makes every person say “aaah, that smells wonderful” and for me it brings all of the layers of makeup together. Once this dries, I set the T-zone and under the eye with the Too Face Blur Flexible Finish Setting Powder and spray the entire face with a layer of Ben Nye Final Seal.
The lip combo was simple and effective. Fenty Gloss Mauve Wives around the outer corners of the lips and pressed Sweet Mouth in the center. Did you know that Vaseline creates a barrier wherever you place it? It definitely helps my glosses last a little longer and seals in the hydration. I used the Rosy Lips Vaseline to go with the pink tones.

Are you interested in booked a natural makeup look for an upcoming event or photoshoot?
Fill out the inquiry form with as much detail as possible and I’ll respond with more information.